Keterangan
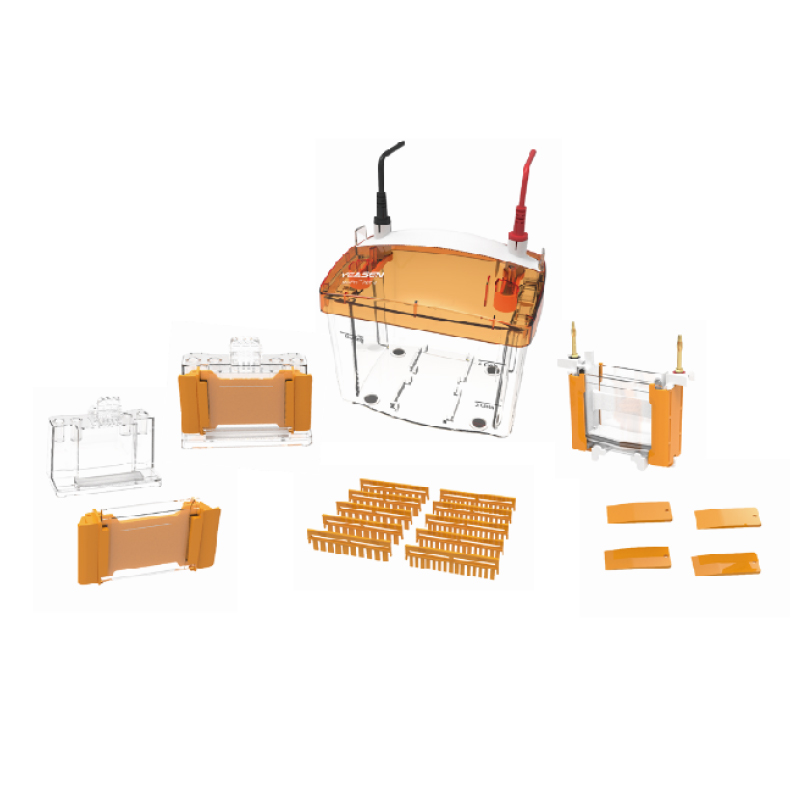
ES-PET4 Vertical Electrophoresis Cell is used to run pre-casting gel and hand-casting gel, at most 4 pieces of gels are available simultaneously. The Electrophoresis Chamber is compatible with 1-D and 2-D electrophoresis application. The gel-casting frame and spacer glass plate make the activity of hand-casting gel simple and avoid the leakage.
Features
High Capacity: Runs 4 gels simultaneously for efficient processing
Precise Separation: Vertical design ensures uniform electric field for clear band resolution
Wide Compatibility – Compatible with standard gel sizes
User-Friendly – Leak-proof design with easy assembly/disassembly
Applications
Polyacrylamide gel electrophoresis (PAGE or SDS-PAGE)
Two-dimensional gel electrophoresis
Screening for new samples
Evaluate sample preparation conditions
Specifications
Part No. |
Product Name |
Qty |
Unit |
Description |
80805ES05 |
Comb |
5 |
pcs |
1.5 mm, 10 teeth |
80806ES05 |
Comb |
5 |
pcs |
1.5 mm, 15 teeth |
80809ES05 |
Spacer Glass Plate |
5 |
pcs |
1.5 mm, 101×82 mm |
80810ES05 |
Short Glass Plate |
10 |
pcs |
100×73 mm |
80811ES05 |
Gel Casting Base |
4 |
pcs |
For gel casting |
80812ES05 |
Gel Casting Frame |
4 |
pcs |
For gel pouring |
80815ES20 |
Gel Casting Frame Hinge |
8 |
pcs |
Mounted on the gel casting frame |
80814ES05 |
Gel Casting Gasket |
5 |
strips |
Seals the glass, placed under the gel casting base |
80816ES05 |
U-shaped Seal Strip |
4 |
strips |
Seals the gel chamber, mounted on both sides of the core |
80817ES05 |
U-shaped Seal Strip (Precast Gel) |
4 |
strips |
Seals the gel chamber, specifically for precast gels |
80818ES05 |
Electrophoresis Core Side Clip |
4 |
pcs |
Mounted on both sides of the core to secure |
80819ES05 |
Electrode Head Core |
1 |
set |
Direct power connection |
80820ES05 |
Mushroom Head Core |
1 |
set |
Indirect power connection |
80821ES05 |
Buffer Barrier |
1 |
pcs |
Used when running 1 gel |
80822ES05 |
Gel Spatula |
5 |
pcs |
For prying open glass plates |
80823ES05 |
Sample Loading Rack |
1 |
pcs |
Facilitates sample loading |
80824ES05 |
Upper Cover (with Cable) |
1 |
set |
Top cover with power cable |
80825ES05 |
Lower Cover |
1 |
set |
Base tank |
80827ES05 |
Glass Plate Holder |
1 |
pcs |
Holds up to 14 glass plates |
80828ES05 |
Centrifuge Tube Rack |
1 |
pcs |
Holds 91 centrifuge tubes of different sizes |
|
Quality Certificate |
1 |
pcs |
Inspection passed |
|
User Manual |
1 |
copy |
Product instructions |
|
Packing List |
1 |
copy |
List of included components |
Components
Components No. |
Name |
80213ES05 |
80213 |
PET4 Vertical Electrophoresis Tank(1.5mm) |
1 Unit |
Shipping and Storage
Transport at ambient temperature, store at room temperature.
Figures

Figure 1: ES-PET4 electrophoresis installation
Operation instructions
Buffer tank and upper lid: The buffer tank and the upper lid are closed to make sure the electrophoresis is conducted smoothly. The power is off when the upper lid is opened. The tank and upper lid are compatible with other electrophoresis module, such as the electrophoresis transfer, 2-D single direction electrophoresis and electrophoresis elution etc.

Figure 2: Installation of gel casting frame and gel base
Maximum volume of sample
|
|
|
|
|
Hole quantity |
Width of hole |
0.75 mm |
1.0 mm |
1.5 mm |
5 |
12.7 mm |
70 μl |
105 μl |
160 μl |
9 |
5.08 mm |
33 μl |
44 μl |
66 μl |
10 |
5.08 mm |
33 μl |
44 μl |
66 μl |
15 |
3.35 mm |
20 μl |
26 μl |
40 μl |
IPG |
6.2 mm |
---- |
420 μl |
730 μl |
Prep/2-D |
|
|
|
|
Reference well 3.1 mm |
13 μl |
17 μl |
30 μl |
|
Sample well |
71.7 mm |
310 μl |
400 μl |
680 μl |
Compatibility of chemical reagent: All the components of ES-PET4 electrophoresis cell should be kept clear of acetone and ethyl alcohol.The damage caused by using the organic reagent is not covered by the guarantee policy.
The comb of ES-PET4 electrophoresis cell should be kept clear of 100% TEMED, whose structure will be damaged by long time friction of TEMED.
Preparing gel plate
Hand casting gel:
1.Note to installation of glass plate clamp and gel casting frame.
a.Put the gel casting frame vertically on the horizontal desk and leave the hinge of gel casting frame open.
Put the gel casting frame vertically on the horizontal desk and leave the hinge of gel casting frame open.
Choose the spacer glass plate according to the thickness of gel and put the short glass plate above (Please refer to the figure 3a).
Keep the marked tip of spacer glass plate up, slide 2 pieces of glass plates into the gel casting frame, make the face of short glass plate forward (Please refer to the figure 3b).
Note: Keep the 2 pieces of glass plates on the same level and right direction of marker. The leakage occurs in case of wrong direction of glass plate and non aligning.
Close the hinge of gel casting frame if the glass plate is in the right position, clamp the glass plate tightly in gel casting frame (Please refer to figure 3c). Check the bottom of glass plate is level.
Keep the hinge of gel casting frame outward and put the gel casting frame on the gel gasket of gel base, then put the spring leverage on the spacer glass plate (Please refer to figure 3d).
Repeat step a-e to make another gel.

Figure 3: Installation of gel casting frame and gel base
GGel casting:
a.Non continued polyacrylamide gel
1.Put the comb into the gel clamp completely and mark the glass plate 1 cm blow the lower end of tooth. The mark indicates the height of separated gel.
2.Mix all the reagent except APS and TEMED to make gel monomer solution, vacuum degassing for more than 15 minutes.
3.Put APS and TEMED in monomer solution after being vacuum degassed, and use the pipette or sample adding pipette to inject the solution between glass plate until reach the marker. Keep stable injection in order to avoid mixing with air.
4.Cover the surface of solution by water or tert-amyl alcohol (2- methyl, 2- butanol). Note: Please inject the water slowly and stably in order to avoid mixing with solution.
5.Leave the gel from 45 minutes to 60 minutes until it is polymerization. Cleanse the surface of gel completely by double distilled water. Do not let the matters of alcohol kind stay on the gel more than 1 hour in order to avoid the dehydration of upper part of gel.
Note: Such separated gel can be store in room temperature overnight. Add 5 ml of 1.5MTri-HCl with ratio of 1 to 4 and buffer with pH8.8 (Laemmli system) to the separated gel to avoid being dried. In case of other buffer, please add 5 ml of 1 fold diluted solution.
6.Prepare spacer gel monomer solution, mix all the reagents except APS and TEMED, vacuum degassing for more than 15 minutes.
7.Use the filter paper to dry the surface of separated gel before injecting spacer gel.
8.Add APS and TEMED in the degassed spacer gel monomer solution and inject the solution until it reaches the level the glass plate.
9.Insert comb and make sure that the back of comb and the glass plate are on the same level.
10.Leave the gel from 45 minutes to 60 minutes until it is polymerization.
11.Take out the comb slightly and cleanse the surface of gel by distilled water and buffer.
12.Cleanse the used gel clamp frame and gel casting frame by distilled water and ion-removing water.
b.Continued polyacrylamide gel
1. Mix all the reagent except APS and TEMED to make gel monomer solution (Please refer to gel list of chapter 4), vacuum degassing for more than 15 minutes.
2. Put APS and TEMED in monomer solution after being vacuum degassed, and inject the solution until it reaches the level the glass plate.
3. Insert comb and make sure that the back of comb and the glass plate are on the same level.
4. Leave the gel from 45 minutes to 60 minutes until it is polymerization.
5. Take out the comb slightly and cleanse the surface of gel by distilled water and buffer.
And cleanse the used gel casting frame and gel base by distilled water and ion-removing water.
2.2 Installation of electrophoresis module and adding sample
Clean and dry ES-PET4 electrophoresis buffer tank.
Electrophoresis module (electrode head electrophoresis core can only be used for 1 piece gel or 2 pieces of gels, mushroom head electrophoresis core should be used in case of 3 pieces of gels or 4 pieces of gels.)
1.Installation
Note: If only run 2 pieces of gels, please use electrode head electrophoresis core. If only run 4 pieces of gels, please use the electrode head electrophoresis core and mushroom head electrophoresis core, each module for 2 pieces of gels.
a.Put the opened gel-casting frame on the clean and horizontal surface of desk (Please refer to the figure 4a).
b.Adjust the short glass plate inwardly, put the first gel sandwich on the gel supporter, there are 2 gel supporters on both two sides of bottom of module, now there is a 30 degree angle between gel plate and module. Be careful to put the first gel and keep balance, then put the second gel on the other side of gel supporter. There are totally 2 pieces of gels slant from the center (Please refer to the figure 4b).
Note: Be sure to adjust the short glass plate inwardly and then put the gels on the two sides of gel clamping frame. The gel clamping frame requires 2 pieces of gels to form the functional module. In case of running odd number of gel (1 piece of gel or 3 pieces of gels), please use single gel plate (Please refer to figure 4b).
c.Push 2 pieces of gel plates slightly to the center, close to U-sealing Strip, to make sure that the short glass plate is under the concave tank of U-sealing Strip.
d.Compress the gel plate tightly by one hand, while close the red gel clamp frame by another hand and make it in the best position. Or hold the whole unit and stabilize the gel plate and close gel clamp frame on both two sides in order to make it be locked in the right position (Please refer to the figure 4c). The gel clamp frame pushes the gel plate to make it and concave tank of red gel gasket matched together tightly in order to avoid the leakage of liquid (Be sure the the short glass plate is under the bottom of concave tank of U-sealing Strip). Thus, use the buffer to cleanse the sample and start to add the sample (Please refer to the figure 4b).
Important note: Never try to close the gel clamp frame when the gel plate is not under the bottom of concave tank of U-sealing Strip. In order to avoid the movement of gel plate in the process of being locked, please use single hand to compress the gel plate on the two sides of gel clamp frame stably and evenly.
Note: Please do not put mushroom head electrophoresis core in the electrophoresis cell when 1-2 gels are running, otherwise the surplus heat is generated which affects the result of electrophoresis separation.


Figure 4: Installation of ES-PET4 electrophoresis module
Sample adding
a.Inject the buffer into the tank, from the outside of outer tank and follow lower part of glass plate, just flood the short glass plate slightly.
b.Add the sample before or after the electrophoresis core putting in the electrophoresis cell, both of two methods are available to obtain satisfied result.
c. Add the sample into the hole by syringe and sample adding pipette.
Note: Make the sample fall onto the bottom of hole slowly and evenly. Be sure not to puncture the bottom.
Note: Anode and cathode should be flooded by the buffer and on the same level.
Put the electrophoresis module in the buffer tank.
Note: The volume requires, 2 pieces of gels with 700ml, 4 pieces of gels with 1000ml.
There are two places of buffer tank for two modules: electrode head electrophoresis core is put in front of the mushroom head electrophoresis core.
Put the ES-PET4 buffer tank on the flat table, make the front side (The side indicating the words of 2 gels and 4 gels) forward. If the direction is correct, the red mark of edge of tank should be on the right side and the black left.
If running 2 pieces of gels, please use the electrophoresis core with tall leads. Put it on the back side of the tank and make the red (+) corresponding to the red mark on the right side of tank.
If running 4 pieces of gels, please use not only the electrophoresis core with tall leads but also the mushroom head electrophoresis core that should put in the front side of the tank. Make the red (+) of the two corresponding to the red mark on the right side of tank. Note: The wrong direction and position will make the upper lid impossible to be closed.
Pour the buffer into the tank until reach the marker.
1.ES-PET4 installation of buffer tank
Put the upper lid on the buffer tank, and make sure the plug plug into socket, the protruded part of upper lid can help avoid the error. Note: The two protruded parts of buffer tank should go through the slot of upper lid in order to make it open and close smoothly. At this time, please compress the upper lid continuously with thumb until is is done.
2.Power condition
Insert the tall leads into the socket of power supply correctly.
Power on the YEASEN-easyPRO, the constant voltage is 200V is recommended for SDS-PAGE and most of native PAGE. 200V voltage is used to run 2 pieces of gels and 4 pieces of gels. The customer choose the voltage according to the real situation. SDS-PAGE needs around 35 minutes under the voltage of 200V.
Extract gel
Power off power supply and disconnect tall leads when the elextrophoresis is done.
Lift the upper lid, take out the electrophoresis core carefully, and pour out the buffer. In order to prevent buffer leakage, please pour out the buffer before opening the clamp.
Take out the gel plate.
Separate the two glass plates carefully and take out the gel.
Put the gel downward and immerse the gel and glass plate in the buffer to make them separated.
Cleanse the ES-PET4 electrophoresis core and buffer tank by the ion-removing distilled water.
Quality guarantee
(1) The warranty is 2 years since the date of sales.
(2) The warranty excludes the following situations otherwise it is charged.
a. No presentation of warranty card and invoice.
b. The invoice is revised.
c. Improper operation or accident factors.
d. The damage is caused by the user’s repair.
e. Out of the warranty, the instrument is still in usage after repair.
Documents:
Safety Data Sheet
Manuals
Pembayaran & Keamanan
Informasi pembayaran Anda diproses dengan aman. Kami tidak menyimpan detail kartu kredit atau memiliki akses ke informasi kartu kredit Anda.
Pertanyaan
Anda mungkin juga menyukai
FAQ
Produk ini hanya untuk keperluan penelitian dan tidak ditujukan untuk penggunaan terapeutik atau diagnostik pada manusia atau hewan. Produk dan konten dilindungi oleh paten, merek dagang, dan hak cipta milik
Aplikasi tertentu mungkin memerlukan hak kekayaan intelektual pihak ketiga tambahan.